Rubber Band Powered Boat


Science Exploration, Engineering, Creative Expression


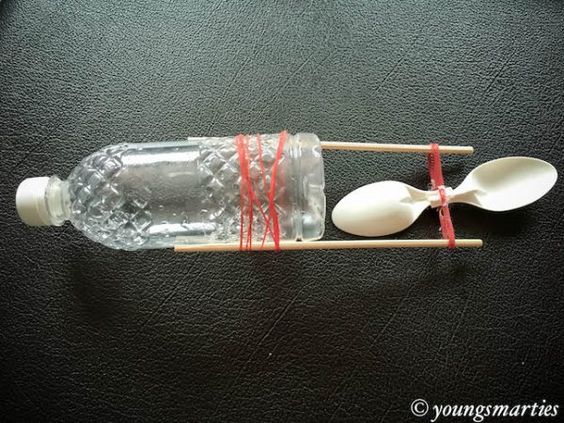
• Empty mineral water bottle (for the boat body)
• A pair of chopsticks (for the boat's frame)
• 2 spoons (with just the “scoop” portion)
• Rubber bands (for propulsion)
• Scotch tape or hot glue gun (for assembly)
• A tub of water (for testing the boat)

1. Introduction:
Begin by discussing boats and how they move through water. Explain the concept of propulsion and how rubber bands can be used to create motion. Show pictures or videos of boats in action to spark interest.
2. Preparation:
Set up an activity area with all materials readily available. Ensure safety when using scissors, hot glue guns, or other tools.
3. Conducting the Activity:
a. Assemble the Boat:
i. Step 1: Stick the chopsticks onto the mineral water bottle using scotch tape and rubber bands to secure them in place.
ii. Step 2: Use a hot glue gun (or UHU glue) to stick the two spoons together, ensuring one spoon is facing up and the other is facing down.
- Attach the Propeller:
i. Step 3: Tie a rubber band near the end of the chopsticks and use hot glue to secure the spoons to the rubber band, ensuring they won’t fall off when the rubber band is wound.
- Test the Boat:
i. Step 4: Fill a tub with water and place the rubber band-powered boat in it. Wind up the rubber band and release it to see the boat move. Encourage children to observe and discuss how it works.
4. Observation and Experiment:
Encourage children to test their boats and observe how far and fast they can go. Ask questions like, “What happens when you change the amount of tension in the rubber band?” and “How can we improve our boat to make it go faster?”
5. Reflection:
Gather the children to reflect on their building process and the mechanics of their boats. Discuss the science behind how their boats work and what adjustments they made to improve performance. Ask questions like, “What did you learn about how boats move?” and “What changes made your boat work better?”